How to Use Our Tools
HANA CV to SQL Converter
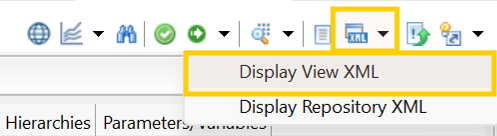
Step 1: Get XML File from HANA Studio
Export your HANA Calculation View as an XML file from SAP HANA Studio. Save the file with a .xml or .txt extension.
Step 2: Upload XML Files
Upload your View XML file using the file upload option. The tool accepts .xml and .txt file formats. For bulk conversion, upload a ZIP file and our AI Agent will extract and process all files in one go.
How to Create a ZIP for Bulk Conversion
- Open the folder on your computer where your HANA XML files are saved.
- Select all the .xml files you want to convert (hold Ctrl / Cmd + click to select multiple files).
- Right-click any selected file and choose "Send to" → "Compressed (zipped) folder" (Windows) or "Compress" (Mac).
- Rename the ZIP file to something meaningful (e.g.,
hana_views_batch1.zip). - Upload the ZIP file — the tool will automatically extract and process all .xml and .txt files inside.
Single file upload

ZIP bulk upload

Step 3: Process Files
Click the Process button to start conversion. The tool validates your XML files, displays node count and credit details, then converts HANA Calculation View logic into standard SQL + metadata mapping. For bulk uploads (ZIP), all files are processed simultaneously with individual tracking.
Tip: The metadata file generated by the HANA CV to SQL Converter is used as input in the SQL Mapping Engine to customize table and column names for your target platform. Download it from your Account — Conversions page after conversion completes.
SQL Mapping Engine
Use the mapping metadata extracted from your HANA XML during conversion to customize table and column names for your target platform, then generate optimized SQL or PySpark code.
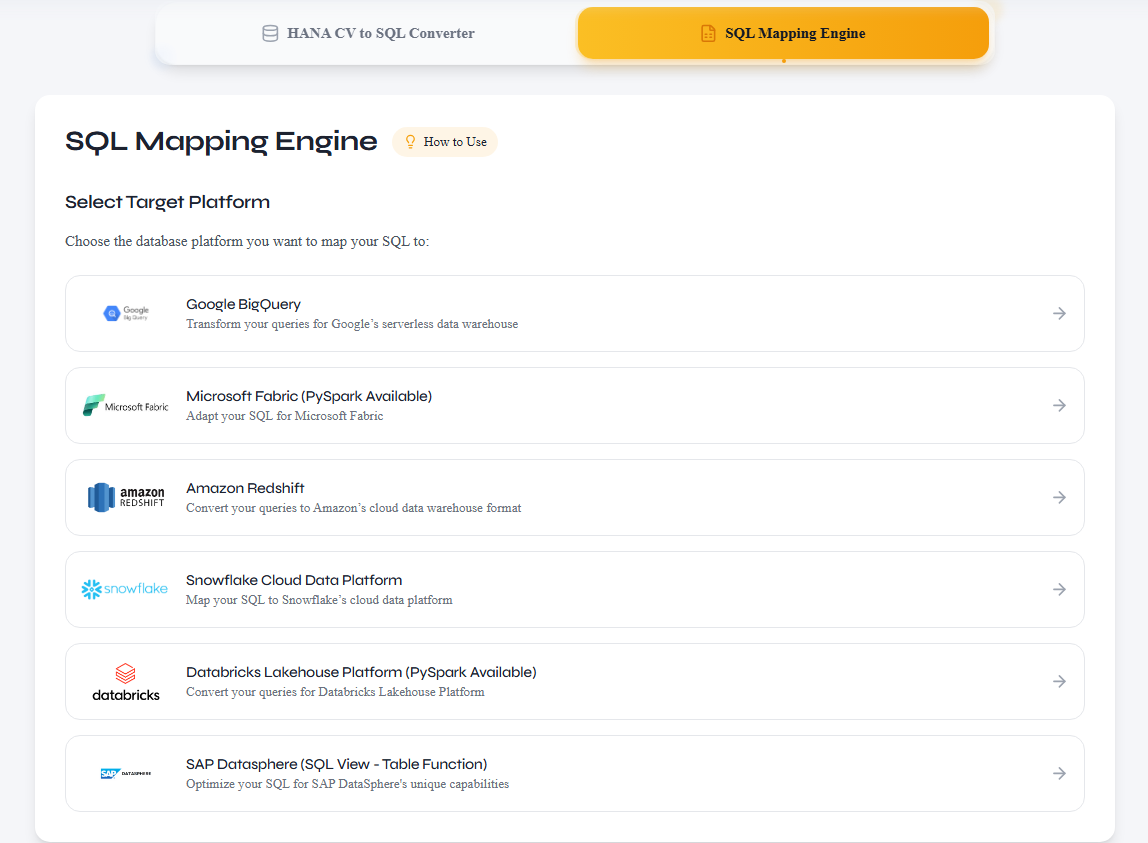
Step 1: Choose Target Platform
Select your target data processing system — BigQuery, Snowflake, Databricks, Redshift, or Microsoft Fabric — to ensure the generated SQL or PySpark is optimized for your platform's dialect.
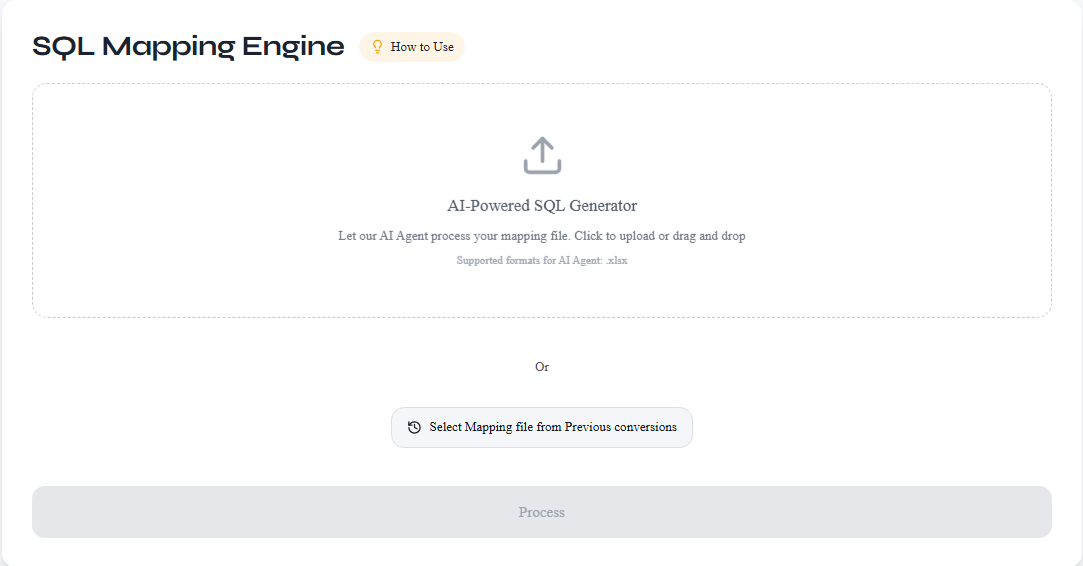
Step 2: Select Mapping Metadata
Select mapping metadata extracted from your HANA XML during conversion. You can either upload the metadata file manually, or select it directly from your conversion history on the Account — Conversions page.
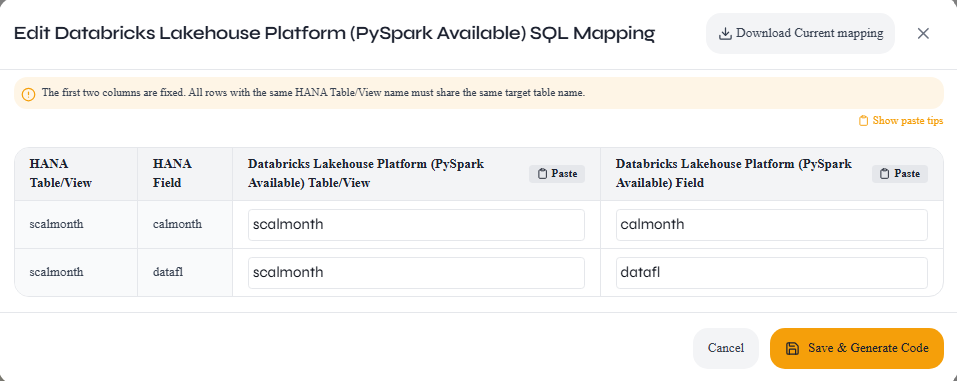
Step 3: Edit Mapping Metadata
Update the table and column names in the mapping sheet to match your target system's schema. You can rename HANA source names to your preferred target names before generating the final SQL or PySpark code.
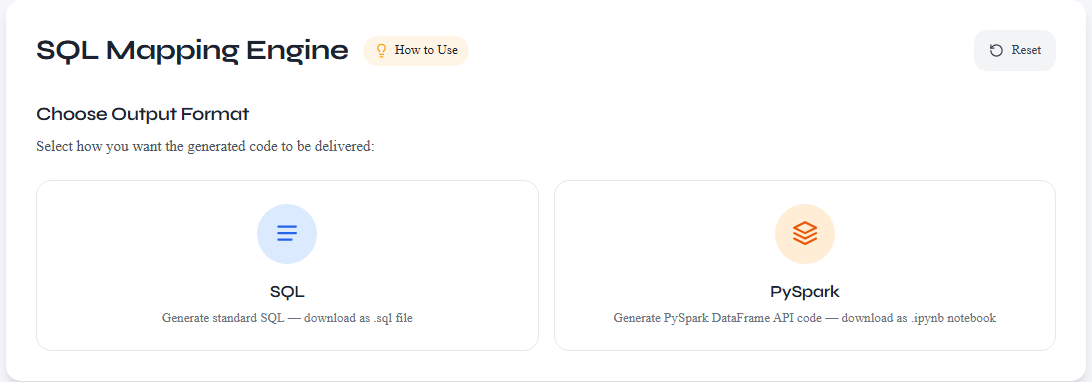
Step 4: Choose Output Format & Download
Select your preferred output format — SQL or PySpark — and download the generated code. The output is tuned to your chosen target platform's dialect.
Frequently Asked Questions
What file formats are supported?
Upload single .xml or .txt files, or a .zip containing multiple .xml/.txt files for bulk conversion.
How do I create a ZIP file for bulk conversion?
Select all your HANA XML files in File Explorer (Windows) or Finder (Mac), right-click, and choose 'Send to > Compressed (zipped) folder' or 'Compress'. Rename the ZIP to something meaningful, then upload it — the tool extracts and processes all .xml/.txt files inside automatically. Subfolders are also supported.
How are credits calculated?
Each HANA Calculation View is analyzed for node complexity. Views with fewer nodes may qualify as Free; more complex views require Paid conversion. Both SQL and PySpark outputs are supported at the same credit cost.
Which platforms and output formats are supported?
Generated SQL and PySpark code is compatible with BigQuery, Snowflake, Databricks, Amazon Redshift, and Microsoft Fabric. Choose SQL for traditional data warehouses or PySpark for Databricks and Spark-based environments.
What does the mapping file do?
The encrypted Excel mapping file lets you map HANA table/column names to your target system's schema before generating final SQL or PySpark code. Use it in the SQL Mapping Engine to customize names for your specific platform.
Can I generate PySpark instead of SQL?
Yes. The SQL Mapping Engine lets you choose SQL or PySpark as the output format. Select PySpark when targeting Databricks or other Spark-based platforms for optimized performance.
Where are my conversions stored?
All conversions are saved in your Account > Conversions page. You can re-download SQL/PySpark files and mapping sheets anytime.
Are there any limitations to the conversion?
Yes. Input parameters, Hierarchies, Currency Conversion, and UOM (Unit of Measurement) Translation require manual handling as these features vary significantly across platforms. These must be adapted separately in your target system after conversion.
Does the tool convert only Calculation Views, or also Procedures and Table Functions?
The tool is focused on Graphical Calculation Views, which are the most complex and time-consuming to migrate. Procedures and Table Functions are already script-based and closely align with standard SQL, making them straightforward to port or rewrite manually without needing a dedicated conversion tool.
Pro Tips
- Always validate your XML files before uploading to ensure proper formatting.
- Name your XML files descriptively before zipping — file names appear in your conversion history for easy identification.
- Minor adjustments to the generated SQL may still be needed for edge cases.
- Download and review the mapping Excel sheet to understand table/column lineage before making changes.